
A few people in the ice cream social wrote to ask me to explain my edgestitching foot in a little more detail. Nothing beats a lesson from your sewing machine dealer, but some of you live in the country and can't get to your rep. So I thought I'd show you the different ways I use my edgestitch foot. You might be suprised by it's versatility. It's sort of an all-purpose foot for me.
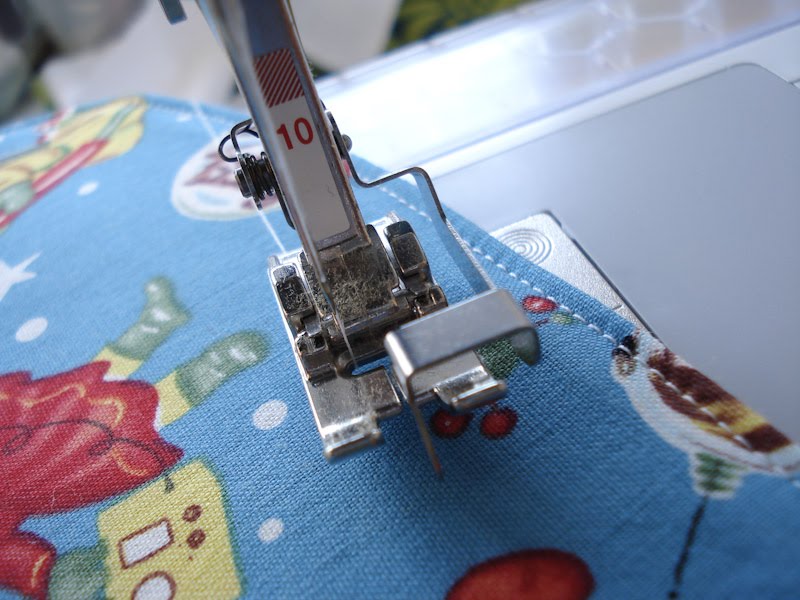
My machine is a Bernina Activa 230 PE and the foot I'm showing today is a #10 foot.
About the foot
The number #10 foot has a blade in the dead center of the foot. This is exactly aligned with the center needle position on your machine. This blade is a fabric guide which you will use to control the position of your fabric. If you are familiar with a 1/4" foot, this is the same concept except it's in the center of your sewing chassis bit.
The needle slot of the #10 foot is wide open which means you are free to use any needle position on your machine. My Activa has 9 positions. 4 to the left, 4 to the right and one in the center. Not only can you work with any position, you are free to use stitches that move the needle back and forth like a zigzag or a decorative stitch.

Basic Use
In it's most basic use, you want to stitch a line just inside the edge of something. This is also called topstitching.
Align your edge to the left side fabric blade. Select a needle position towards the left. I usually use 2 or 3, but it depends on how tight of an edge I would like. Begin to straight stitch and you will get a nice crisp edge around your project. (see picture of bib above)

It also works on the right side as well.

Tidy Seam, Stitch in the Ditch
Sometimes you want to press your seam allowance to one side and ensure they stay on that side of your fabric. To do this, you simply press your seams in one direction. Then align your edgestitch foot blade exactly on the ditch of the seam. Move the needle position to the side of the seam where you've pressed your seam allowance. Stitch away and it will stay put and you will have an even tidy finish on top.


By just moving your needle fractionally or leaving it centered, you can achieve several stitch in the ditch techniques useful in all sorts of projects.
Pleats and Tucks
I'll confess that I'm not versed on the technical terms for pleats and tucks. But you can achieve lots of interesting texture with your edgestitch foot. You can repeatedly fold your fabric, stitch along the edge and then open up the seam. Doing so with the same needle position and even spaces results in tiny little pintucks or pleats (is that the right term?) My example is actually a scrap of fabric where I experiemented with needle positions and a failure in terms of nice pintucks! Ineffective as pintucks, but hopefully a good enough picture that you can see the potential.


You can also add larger tidy folds for larger pleats (tucks?)


Attaching Something With a Clean Edge
One of the more common ways that I used my foot is to attach something with a clean edge on top of something else. This is quite easy because you can use the center blade as a guide. Here I've attached linen trim to webbing to create a keychain.

I've also used it to slap my dresden on top of the base fabric for my quilts.

On these pockets, I used the edgestitch foot first with needle position 2, then needle position 4. The result is a faux twin tip needle effect and has vaguely parallel lines attaching my pocket to my bodice.

Applique
The center blade makes a wonderful guide while doing applique. It works with straight, zigzag and decorative stitches so it gives you more veratility. For this example, I didn't bother with fusible heat-n-bond and I opted for a wide zigzag. The result centers your stitch across the edge of the applique object. You could also choose an internal needle position and a straight stitch, if you'd like a raw edge applique look.


Attaching Fabrics Together and Lace
During my demo from my Bernina dealer last year, she said "and you know when you're adding fine lace too..." and at that point, I glazed over. I missed a bit of the funcitonality. Lace isn't really something I use, but apparently you can do something wonderful with it using this foot.
You can also use it to join things with folded or finished edges by using both sides of the guide and a very narrow zigzag stitch. I used this to tack the center back of my yoke together for the ice cream social at the bottom bit.


Raw Edge Treatments
Of course, you can use the edgestitch foot as a guide for treating raw edges too. If you want to do a straight stitch or zigzag on the raw edge to prevent fraying, the #10 foot can help you with a tidy result.
So those are just a few of the ways I used my #10 foot edgestitch foot. Far more versatile than I anticipated when I bought it. I'm so pleased my dealer suggested it. I went in for a bias binding attachment and they thought this would suit me better. They were right.
Thank-you so much - we have the same machine. Now I'm off to the dealer to get the edgestitch foot!
ReplyDeleteThanks so much for this, Amy! Topstitching is my nemesis and I can see how a foot like this would make it SO much easier!
ReplyDeleteThanks so much, I can't wait to start using mine now I know what it's for! This foot came with my 2nd hand Bernina & wasn't covered in my sewing lesson so I've always just looked at it in a puzzled way & put it back :)
ReplyDeleteCrikey!!
ReplyDeleteWho knew?
Clearly I need a new fancy pants machine with an edgestitch foot!! I do all this the hard way :)
ReplyDeletethis is so great! My machine came with this foot as well and I had no idea what the heck I'd use it for!!! thank you SO much!
ReplyDeleteWhenever I see a post demonstrating a foot like this, I run to my machine and pull out all my presser feet - and voila! I have a blind hem foot which is nearly like an edgestitch foot. And Bernina says you can use it like an edgestitch foot, but it's a bit more limited. Thank you so much I will give it a go next time!!
ReplyDeleteBet this would be great for top stitching binding as well...
ReplyDeleteIM all over this foot...Thanks for the share.
What Andi said!
ReplyDeleteWow! I am totally demystified! What an awesome foot. Now I know how you get such neat topstitching. I've been using masking tape for my guide line or my 1/4" foot. This looks so much neater. Thanks for putting all the info up on the different uses.
ReplyDeleteThis is going to the top of my shopping list!
ReplyDeleteI like your "vaguely parallel lines". Isn't that the most one can ask for out of life?
fabulous tute Amy - thanks so much!
ReplyDeleteGreat tute on the edgestitch foot!
ReplyDeleteIt is one of my most favourite feet. I topstitch a lot. Worth every cent!
I can't tell you how many times I've looked at the binding foot, I still haven't been able to bring myself to spend that much plus the ladies at the shop are never that excited by it.
and I always wondered why my edge stitching looked so iffy. I'm of to look in the box. cheers
ReplyDeleteAwesome info!! I love love love my edgestitch foot for the most obvious uses (edgestitching and stitching in the ditch) but your suggestions for using it on applique or joining fabrics has me falling in love with this foot all over again. I linked to your post over at Craft Gossip Sewing:
ReplyDeletehttp://sewing.craftgossip.com/tutorial-perfect-edgestitching-and-stitching-in-the-ditch-with-your-edgestitch-foot/2010/07/26/
--Anne
Thanks for this post! I have a Bernina and we did use that edgestitch foot in our Mastery class, but I really wasn't so much of a fan. Now, I can see so many more uses and realize I'd better save up to purchase one!
ReplyDeleteI don't have a Bernina, but one of these came with my machine, and I had no clue what it was for! Thanks so much, you have given me lots of options for ways to make my projects easier with this foot!
ReplyDeleteI have the same machine, and that foot! Thanks for sharing.
ReplyDeleteI just saw these existed recently...Now I know I've gotta get one. Thanks!
ReplyDeleteYou're the BEST! thank you for this. It definitely takes the mystery out of this little foot. xoxo
ReplyDeletewow amy, this is so so great! Thanks for all the tips, I think I might just have to get an edgestitch foot!
ReplyDeleteHi! I have a bernina #5 foot, is there any chance i can use it the same way???
ReplyDeleteThank you for sharing... this is something that I will have to add to my Wish List for our next trip into the city.
ReplyDeleteYou so make me want a edgestitch foot! Thanks for the great info and pics.!!
ReplyDeleteWow, this is great! What a great and helpful post! Thanks so much for taking the edge off, I'll be linking. =)
ReplyDeleteThanks for the great tips! I have been limited to the most basic sewings for quite long. Now I am making cute dresses for my baby, I definitely need some of these fancier stuffs. Thanks for sharing your knowledge.
ReplyDeleteGreat information! I LOVE my #10 foot, and use it just about every time I turn on my machine.
ReplyDeleteYou are fantastic! Thanks for sharing your knowledge and tips. I'm going to see if I have an edgestitch foot and it may become my new best friend. ha ha.
ReplyDeleteYou did an awesome job explaining this foot AND gave me even more info that I already knew. This was one of the first feet I bought when I got my Husqvarna D1 because I took a class to learn how to make a wall hanging quilt. We used that foot to sitch in the ditch on the quilt. After I saw how wonderful that worked I left that day with my own foot. But now I have more ideas too thanks to your explanations. Thank you.
ReplyDeleteDo you know how long this foot has been sitting in the box and I not knowing what to do with it.......far too long let me tell you!!! Thank you for this I may even give it a go tomorrow.
ReplyDeleteright I'm off to check my sewing machine and see if I have one. Thanks for the tips!
ReplyDeleteI have a Bernina myself but this sewing foot wasn't usefull to me, but now... !!!!
ReplyDeleteHey, this could work for Hexies, right!?!
ReplyDeleteIt could save some time, but would it look as good??
ReplyDeleteYou have rocked my world with this! I have no other foot than the one that came with my machine but I will be getting this one! I was wondering how everyone got their applique zig zag so perfect!!!!!! And the top stitch so close to the edge! Amazing, thank you!
ReplyDeleteThank you so much. I was in the middle of a quilting project using the "stitch in the ditch" method but struggling with keeping the lines straight. I used the edging foot and it was amazingly easy! I kept it on and used it for my binding as well.
ReplyDeleteI linked this post on my blog http://anaccomplishedlady.blogsport.com
Thanks again
This foot awesome!! I haven't bound any of my quilts I have made because I was afraid of the binding.
ReplyDeleteI have a question though. I have singer and brother machines, what foot would be the equivalent to yours?
I have this foot! Mine is a #5 but it looks exactly like yours. Maybe it's the difference in machine models? Anyway... I thought "I will never use this foot, why did they give it to me?"
ReplyDeleteOooooh if only I had seen this post earlier today! It would have made attaching my round appliques so much tidier!
Can't wait to use it now and I am bookmarking this post for further referance!
Thanks for taking the time to write this!
Great article! This will help a beginner like myself out so much! I featured you on my blog as well! Thanks! :)
ReplyDeletehttp://aworldofcrafts.blogspot.com/
i do love my foot #10 especially when doing machine binding for small quilted items and again you have made such informative tutorial. Thanks
ReplyDeleteHow awesome - thank you!!! JenT
ReplyDeleteOh my goodness, I read this whole thing thinking, "why didn't I think of that? why haven't I been doing that?" Thank you so much! My #10 foot (I'm also a bernina girl) is going to get a lot more of a work out! A LOT more! Thanks again, fantastic tutorial!
ReplyDeleteI saw this post and read it and immediately search for a Brother's site to see if Brother had one foot like your #10...found a great online booklet where they explained all the feet, saw one similar to your 10 and then I checked my machine...in my little box of feet there it was. Just lying around for already 20 years. I have never used it. Not yet. Because the next time I need sewing and edge I will definitely remember! Thank you for reminding me!
ReplyDeleteI have a Pfaff which has the same foot and never knew all the things it could do. Now I can spread the word through our guild newsletter! I bet you could do some neat faggoting stitchwork by having the fabric pieces held the width of a wide zigzag stitch apart.apart
ReplyDeleteExcellent tute. It has given me many ideas. Thank you so much.
ReplyDeleteI have the #5 foot. you think it'll act the same as the #10?
ReplyDeleteI'm afraid they are different feet, Pamela. The #5 is a blind hem foot. The metal bit at the bottom is shaped differently. It's a bit longer and more cumbersome.
DeleteI have the #5 foot. You think it could act the same as the #10 foot?
ReplyDeleteI love the #10 foot and use it most every day!
ReplyDeleteglory be! thank you for this :)
ReplyDeleteglory be! thankyou for this! i am sewing doll clothes and quiet books, and what a great way to get through small edges quick!
ReplyDeleteThanks so much for this. I didn't even know I had an edgestitch foot till just now when I've checked.
ReplyDeletearticle from a very amazing, Good Job, Thank you for presenting a wide variety of information that is very interesting to see in this artikle
ReplyDeleteLEMARI
lemari pakaian minimalis
lemari pakaian 3 pintu
lemari hias anak
almari arsip ukir
lemari pakaian modern
lemari pakaian 2 pintu
almari rak buku
lemari pakaian jati
lemari pakaian rahwana
lemari baju besar
lemari pakaian anak
lemari pakaian jati
lemari pakaian kecil
lemari pakaian jati
lemari hias pajangan
lemari dokumen ukiran
lemari pakaian mewah
lemari pakaian duco
lemari pakaian ukir
lemari pakaian pahatan
almari minimalis jati
almari pakaian antik
almari ukir jati
almari pakaian minimalis
almari pakaian mahoni
almari pakaian jati
almari hias jati
almari nakas minimalis
almari pajangan kaca
almari nakas
lemari nakas
Thank you so much for sharing this!! I already use it for edge finishing, when I don't want to get the serger out, and to zigzag over button hole thread to draw a gather, if the machine I am using won't do the long stitch, tight top tension trick. Now I can see a gazillion more uses for it!
ReplyDeleteGreat tutorial......yes correct term is pin tucks. You have some great ideas...some things I never would have thought of and now am keen to try.Thanks
ReplyDeleteThank you for taking the time to explain so well, I have used my foot as a guide but never really thought how versatile it could be. Off to have a play with my machine now!
ReplyDeleteI used to work for Bernina in the '80s. In the training they also showed us how to apply bias binding perfectly with foot no 10, as well as piping. It is the most amazing foot ever. I would be lost without mine !
ReplyDelete