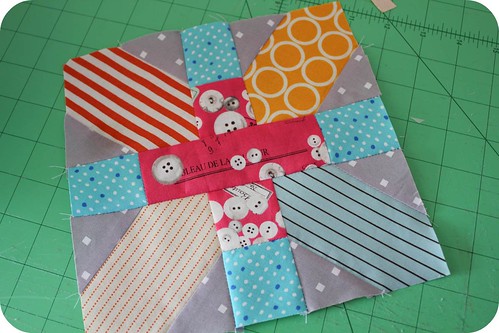
I joined another quilt bee, but my month isn't until September. I've decided ahead of time that I'm going to ask for blocks like the Setsuko Inagawa quilt from this year's Tokyo Quilt Festival. Jan was a legend and took all sorts of wonderful photos and closeups of it. It's been the buzz of flickr since January.
Edit: I actively searched for the original source of this block without much luck. Luckily the internet is full of helpful people. Thanks to Amy, I now know this block is attributed to Nancy Cabot, 1938 Source: Barbara Brackman's Encyclopedia of Pieced Quilt Patterns.
I couldn't find the pattern in any of our Japanese quilt books, so I decided to reverse engineer it. So I futzed in Word and posted some diagrams to flickr for my quilt bee girls. Shortly afterwards, I was inundated with requests for a full tutorial. I was also approached by several girls wanting a sewalong (details at the bottom of this point).
Though my quilt bee month isn't until September, I said I would do a blog post about how I made the blocks. Bear in mind, this is my method. This is not necessarily the one used to create the actual inspiration quilt above and my sizes might vary slightly from the actual quilt. It seems to work well for me.
Also, my test blocks are a bit rough. Corners are missing, threads aren't trimmed. Fabric isn't pressed. For me this is a scrap eating project, not an heirloom. So if my points drift a little or I put a piece of fabric in backwards, I'm not going to beat myself up over it. I want this to be relaxed and fun.
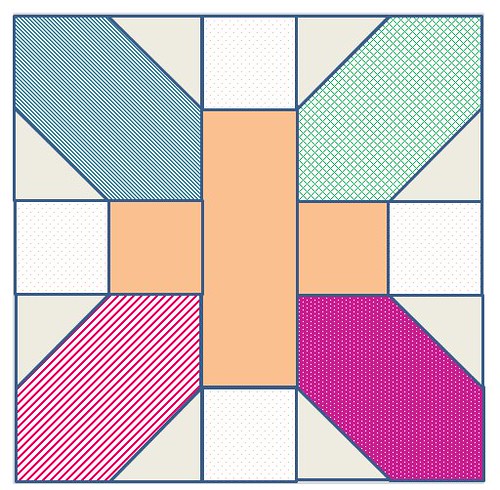
Picking Fabrics
Each block is made up of 7 total fabrics. This quilt is very scrappy, so it does not matter if you choose lights or darks for each area. Just make sure you have 7 total fabrics in a block.
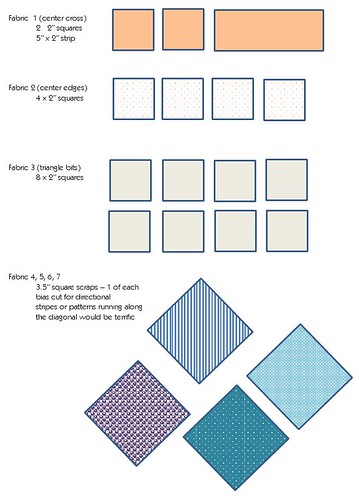
1 fabric for the center cross - two 2" squares, one 5" x 2" strip
1 fabric for the edges of the cross - four 2" squares
1 fabric for the background triangles - eight 2" squares
4 fabrics for branches of the x - four different 3.5" squares cut on point
After testing several blocks, I believe at the four fabrics for the x look best when they are cut on point so the print runs along the length of the x. Visually this gives you the strongest impact, but it is more difficult to sew because the fabric can stretch since it's cut diagonal to the grain. You can cut a 3.5" square on point out of a roughly 5" straight square. So if you are scrap gathering, looking for fabrics about this size.
In my example, I choose quite a few stripes in case this wasn't clear. Feel free to fussy cut some fabrics so their design ends up centered on the block. If you look closely, you'll see that the original Japanese design is quite fussy cut. The dots usually align perfectly down the center. There are special pieces. Scrappy or fussy. It's up to you.
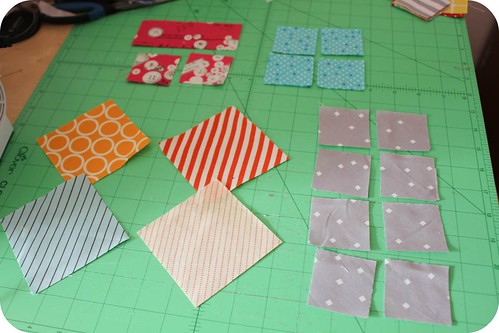
Creating the X branches
If you omitted the center cross and cross edges, you would be left with a traditional quilt block pattern called the Road to Tennessee or Indian Hatchet, depending which source you use. For each block, we create four x branches or corners.
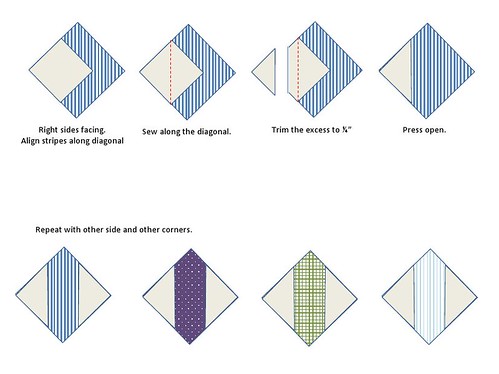
Begin by aligning one 2" background square onto of one 3.5" aligning the corners with right sides facing. Note: the stripes run vertically. This will have the biggest impact visually for your quilt. In the original Japanese quilt, most stripes on the corners run vertically, but there are some exceptions.
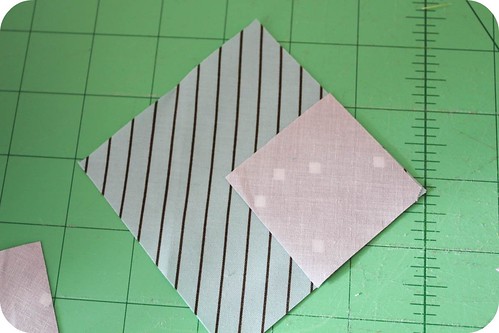
Using a fabric marking pen and straight edge, draw a straight line for corner to corner on your background fabric as shown.
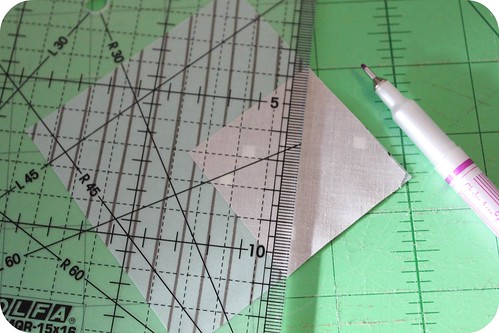
Sew directly on the line you just traced
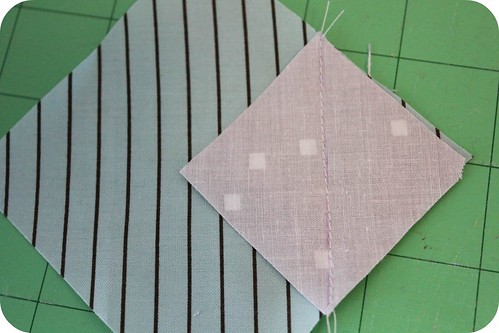
Trim away the outer edge, leaving 1/4" for seam allowance.
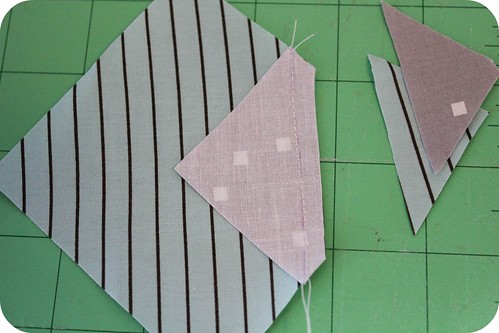
Press open and repeat for the opposite corner
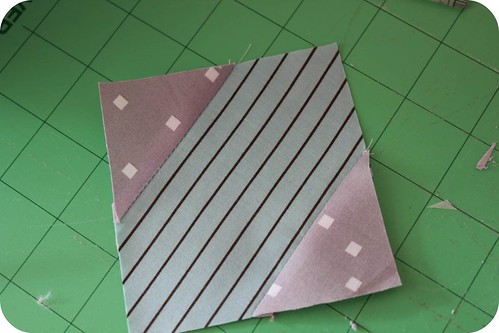
As you can see, even without the center cross, this quilt design has quite an impact. I believe these are called Indian Hatchet or Road to Tennessee blocks and they are traditionally made in the inverse with a common fabric on the X and scrappy fabric in the little triangles. Well-schooled quilters, please feel free to correct me. I'm always happy to learn.
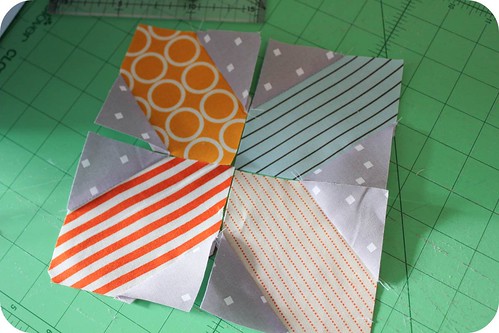
Tip: Making each corner one by one can tedious, so I like to do all of my marking in one step and then chain piece to make the process faster.
I originally drew diagrams in word, but was asked to take pictures of the block making process, so feel free to print them out instead of the full blog post.
Making the +
Making the + in the center of the x is simply a matter of laying out your fabrics and sewing the pieces together with a 1/4" seam.
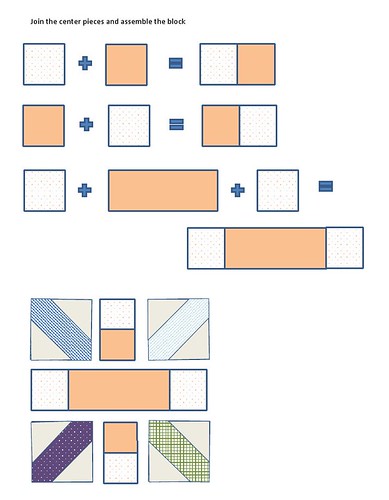
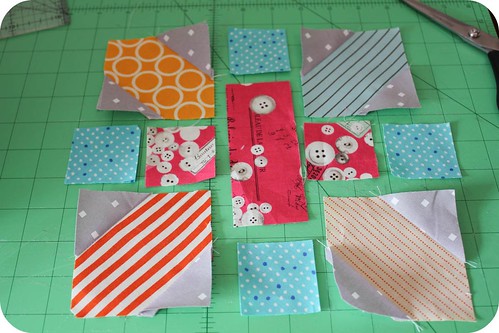

That's it, your first block is done!
I've been doing test blocks, but haven't put much together properly yet. I have until September before I get started in earnest. You can see how it's going to shape up though. I know my blocks look a bit rough. Remember, I'm making something fun for me and not an heirloom. Patchwork doesn't always have to be perfect, but it should always make you happy.
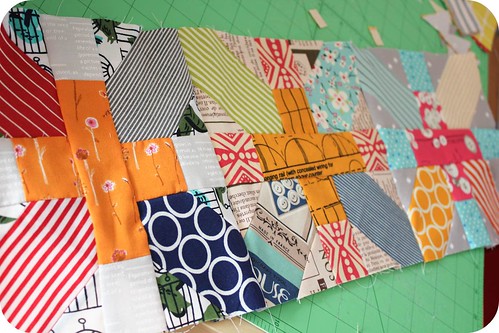
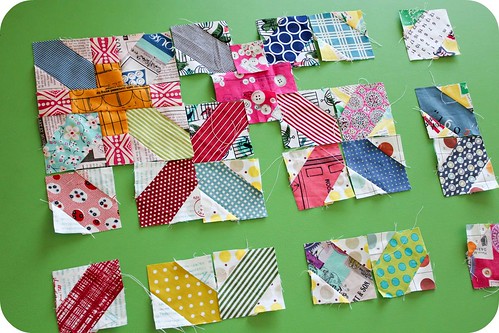
Once again, I think its important to mention that this tutorial is inspired by Setsuko Inawaga's submission to the Tokyo Quilt Festival. If you make one and are assigning credit, it really should go to her. In addition to these blocks, the original quilt has some stunning applique work, test and macarons. I encourage you to run with this idea and make it your own. Also, I am thankful to Jan (Be*Mused) for her love of Japanese fabric and quilting and for sharing years of photography from the Tokyo Quilt Festival.

That's it! If it doesn't make sense or something is unclear, do ask. I'm sure others have the same question. I'll update the tutorial in that case. Or if you have any tips or suggestions, I'm sure the girls will love them. Laura has already started one of the japanese x and + quilt-along groups on Flickr. I believe they are officially kicking off in June. Feel free to join them and discuss colour ideas, share scraps from your bin and get ready!
Edit: answers to great questions -
- What is the final block size? 7.5" finished, 8" including seam allowance


These are really awesome! thanks for putting this together. What's the final block size? 8"?
ReplyDeleteThanks again Amy! I'm going to try and make my blocks bigger, I'm a bit impatient like that!
ReplyDeletedid you end up making your blocks bigger? If so, do you have a those cutting instructions handy, maybe? I realize this has been a while ago, but I just this minute found this tutorial..thanks so much
DeleteGreat block! Thanks for the tutorial!
ReplyDeleteHey Amy
ReplyDeleteI love this block! I'm going to add it to my To Do List.
Thanks
dxx
"Patchwork doesn't always have to be perfect, but it should always make you happy." - Best sentiment ever!
ReplyDeleteThanks for the tutorial, I love that quilt! I'm definitely going to give this a try.
ReplyDeleteLooks Fab :)
ReplyDeleteTHANK YOU, AMY! When I saw the block I thought of having my virtual bee make some for me. Hope you don't mind if I swipe this idea and send them over for your fab tutorial. As kismet would have it, my bee month is May. Sweet!
ReplyDeleteAmy!! Thank you SO much for figuring this out - I love this block. There are so many possibilities with it. I can't wait to see your finished product.
ReplyDeleteI love the original quilt inspiration and thank you for the reverse engineering. I expect I will be making some of these soon!
ReplyDelete'Thought you'd like a heads up, it looks like the 8th or 9th flickr image isn't working? flickr says it's unavailable?
ReplyDeleteHi Amy, this is a beautiful block! I'm darfting it up for a 12" block in EQ. Man those fractions of an inch are tricky! Will post a piccie when I'm done. Lorena
ReplyDeleteThis is so inspiring! I love it:)
ReplyDeletei love this amy, thanks for writing up the instructions. I really am inspired by the block, my scrap bins are overflowing!
ReplyDeleteLove the block. Thanks for the tutorial. Hugs.
ReplyDeleteWow!!Fantastic post..Nice tutorial shred..I like your such block pattern..it looks awesome.
ReplyDeletekamagra online
Great block!! Thanks for sharing the pattern with us.
ReplyDeleteHow fun is this block?? Super great fun. Thank you for the tutorial.
ReplyDeleteHave a super great sewing and stitching day.
Thanks so much for this tutorial! I feel like I was meant to make this block because I have a 2" square die and a 3.5" square die for my Accuquilt die cutter. I'm super lazy when it comes to rotary cutting these days!
ReplyDeleteThat is such a pretty and eye catching block! Thanks so much for the how-to, I'll be spreading the word.
ReplyDeleteThank you! So much awesomeness! I have so many prints that would suit this block perfectly.
ReplyDeleteBTW, found this via One Pretty Thing.
Many many thanks for taking the time to write and share a tut for this fabulous block - I love its uniqueness and sense of scrappy fun in all different fabric ! Much appreciated.
ReplyDeleteI found your blog from reading Freebies for Crafters this morning
Really COOL! Thanks for the TUT!!!
ReplyDeleteI want to try it 'cause it's too cute not to!!!
Amy, do you happen to have the instructions in pdf format?
ReplyDeleteThank you for this fabulous tutorial! Very inspiring! I just began a scrap quilt using outgrown baby clothes. You can see the beginnings of it here.
ReplyDeleteHey, this is really wild! Love the block. Thanks for making it into such a clear tutorial
ReplyDeleteThanks for the great tutorial, it ws really good to follow. I've linked to my blog
ReplyDeletelove it. I'm looking forward to trying it out!
ReplyDeletethanks for the tutorial... making some of these tonight!
ReplyDeleteI like this block. I'd like your opinion on measurements if I wanted to make a 12" block?
ReplyDeleteYou just made my day! I am always trying to find ways to use my scraps and you just shared a wonderful way! I'll be making these this week. Thank you for your thoughtfulness of sharing with the rest of us quilters! It is very generous. We all *heart* you!
ReplyDeleteI might be about to wreck my plans for being productive on other things for the rest of the day to make some (lots) of these, but...
ReplyDeleteIs there a good way to print this? I tried printing to a pdf, but I just get the first screen in triplicate.
I was going to print not all of it, just the diagrammy bits - maybe I'll just pull them off of flickr, but if there's an easier pre-made way to print, please let me know.
Thanks!
I am having the same difficulty with printing, but I am getting only the first screen. It would be great to have a PDF. I wouldn't care if you were to watermark the heck out of it.
ReplyDeleteCan't wait to try this out!
ReplyDeleteHi, I love this block! Do you have any suggestions for selecting fabrics for this block? I haven't been able to quilt in a couple of years and I'm feeling a bit stuck on fabric selection. Thanks!
ReplyDeleteMaking these in my quild - love,love,love.. thanks so much for sharing!!
ReplyDeleteI love this block too, and used it for my month on the Bee a (modern) Swapper bee on flickr. I enlarged the size somewhat, so if you'd like a pattern for a larger one, 13", you can find it here: http://demandingcatquilts.blogspot.com/2012/10/x-plus-block-bit-larger.html
ReplyDeleteThanks for the tutorial Miss Amy, love your work. xo
ReplyDeleteThanks so much for the tutorial - I think I need to try this one. Sounds like your block exchange is going to be tons of fun - enjoy!
ReplyDeleteThis block looks like something I would enjoy making. thanks so much for sharing.
ReplyDeleteBeautiful! Thank you so much for writing this up.
ReplyDeleteThanks for sharing your block instructions. I have adding your post to my Freebies for Crafters blog...thanks Khris
ReplyDeleteشركة عزل خزانات بالرياض
ReplyDeleteشركة مكافحة حشرات بالرياض
شركة تخزين اثاث
شركة نقل اثاث الرياض
شركة كشف تسربات المياه بالرياض
شركة تنظيف بيارات بالرياض
شركة تسليك مجارى
شركة جلى بلاط بالرياض
شركة تنظيف كنب بالرياض
شركة تنظيف منازل بالرياض
شركة عزل خزانات بالرياض
شركة مكافحة حشرات بالرياض
شركة تخزين اثاث
شركة رش مبيدات بالرياض
شركة نقل اثاث الرياض
عزل مائي
شركة تخزين عفش بالرياض
شركة تنظيف اثاث بالرياض
شحن عفش داخل السعودية
شركات نقل وتغليف اثاث
شركة تخزين اثاث بالرياض
ReplyDeleteشركة نقل اثاث الرياض
شركة كشف تسربات المياه بالرياض
ReplyDeleteشركة تنظيف بيارات بالرياض
شركة تنظيف كنب بالرياض
ReplyDeleteشركة تنظيف منازل بالرياض
شركة تسليك مجاري بالرياض
ReplyDeleteشركة جلي بلاط بالرياض
ReplyDeleteI would love a 12 inch block draft. Pls send if you have one or bigger size.
ReplyDeleteI'm making this quite right now - thanks for the inspiration!
ReplyDeleteHi, Love your blog. Would like to post your + and x tutorial on our guild blog for members to access. We are making a charity quilt with donated fabric. Your tutorial is perfect for the quilt. Is this ok w you? Check us out at NHMQG.wordpress.com
ReplyDeleteI finished it! Thank you so much for such a clear tutorial. I love it.
ReplyDeleteI wish all tutorials were as lucid as this one. Thank you. Jane
ReplyDeleteThanks for the great tutorial, it was really good to follow. I've linked to my blog
ReplyDeleteJust wondering when cutting the 3.5 inch squares, if you don't have an obvious vertical design, do they need to be cut on point? Will it matter if some squares are cut on point and others are not?
ReplyDeleteI first saw this block on a blog, "Lurline's Place" in 2011, and drafted the pattern into five inch blocks. I ended up adding sashing to avoid joining all those seams. 225 blocks mad a large and very scrappy quilt.
ReplyDelete